The Basics of Drywall Installation
Drywall Installation Naperville can significantly alter the look and feel of a room. Some steps in the process require more skill than others.
Whenever possible, sit the ends of each drywall sheet halfway over the closest framing component. Secure the drywall with five evenly-spaced screws in a line across the board and into the strapping or joist.
Drywall installation is relatively simple, but following certain tips is important to ensure a quality finish. First, make sure your framing is flat from one stud or joist to the next. This prevents the walls and ceiling from bowing, creating odd contours in your finished room. Use a level or straight board to check for consistency, and shim any areas that don’t sit properly.
Before you start hanging the drywall:
- Run a bead of glue down each strapping or joist over which you’ll be placing a panel. This will help the drywall stick to the wood, and it will also keep it from shifting later on.
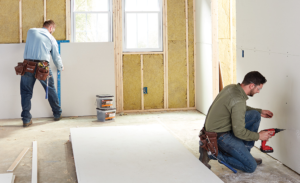
- When you’re ready to hang the first sheet, have someone help you hoist it up and position it against the wall.
- Once it’s in place, drive five evenly-spaced screws into the drywall, starting in the center and working outward. The screw heads should indent the paper slightly, but not break through it.
As you work, be sure to stagger the seams so that they don’t line up with wall openings or the frames of window and door openings. Doing so requires additional cuts and increases waste, as well as reducing the strength of the wall. It’s also possible for the seams to crack down the road if they aren’t staggered.
When cutting a new piece of drywall, measure its length and mark it with a utility knife and a drywall square before you cut it. This way, you’ll have a guideline to follow when positioning the next piece.
Whenever possible, use full sheets to cover wall openings rather than cutting out a section for doors or windows. This will give you a much more even surface, which is easier to tape and paint. It’s also a lot easier to install the trim before you install the drywall, as opposed to after.
When it comes to outside corners, a metal corner bead can make your job much easier. It covers the exposed edge of a drywall panel and helps prevent water from seeping in, but it isn’t necessary for interior walls.
The most important step in drywall installation is taping the joints. It’s a time-consuming process, but it is the key to creating smooth and seam-free surfaces. It’s also the only opportunity you have to correct errors such as improperly set fasteners and misaligned studs.
It’s recommended that you use a premixed all-purpose joint compound (also known as mud) for your main application of tape to the joints and corners. This type of mud is designed to adhere the tape better than powdered drywall compound. You can also find a range of different formulations of tape and mud that are meant for specific applications, such as butt or corner joints.
Regardless of the type of mud you’re using, always follow the manufacturer’s directions on mixing and drying times. Also, be sure to stir the mud and add water as needed if it becomes thick. Before you apply the first coat of mud, prefill any gaps with a small flexible putty knife such as Hyde Tools’ Black & Silver 2-Inch Flexible Putty Knife. This will help the mud adhere to the tape better and prevent any gaps from showing through.
When applying the mud, use generous amounts. You want the mud to completely encapsulate the tape, so make sure it’s fully saturated. Apply a second coat of mud that is slightly thicker, but be careful not to overfill the recessed area of the joint. Overfilling leads to weak joints that are prone to sagging and cracking later on.
For corners, make a “ribbon” of mud about 1/8 inch thick and 2 inches long along the corner. Then, press a length of paper tape firmly into the mud and rub it flat with your drywall knife to embed it. After you have applied all of the mud, feather out both edges of the tape to blend it with the surrounding drywall.
If you’re installing butt joints, install blocks between the studs or joists to create a recess that will make it easier to tape. This is an especially good idea for exterior walls. However, even with a block, you’ll still need to be very careful at butt joints to make sure you fully fill the recessed area with tape and mud.
Drywall finishing is a vital step that will make or break the look of your project. It’s the process of hiding all the tape and smoothing out the seams to create a clean and even surface. This phase requires a lot of patience, but it’s worth it in the end.
For this step, you will need a bucket of premixed all-purpose drywall joint compound or “mud.” Fill a mud pan with enough of the product to cover all the areas that you will be working on. Using the same technique that you used for tape, apply a thin coat of joint compound over every horizontal and vertical seam. Then, use a putty knife to spread the material over each corner and edge of each wallboard. Once the thin layer of compound is dried, sand it with a palm sander to remove any tool marks or low spots.
If you have any protruding screw heads, gently drag a putty knife over them to set them. Do not hammer them in, as this can cause them to break through the paper and reduce their holding power. It’s also a good idea to mark any areas that need touch-up with marking chalk, so that you can remember where those spots are when it comes time to spot sand them.
Once all the joints are sanded and finished, it’s time for the last phase of drywall installation: skim coating. This involves applying a thin layer of joint compound over the entire surface of the wallboard, overlapping all previous applications by at least an inch. Once the thin coat is dry, sand it with a palm or power sander to remove any tool marks or smooth the surface of the drywall.
When installing drywall, it’s important to always sit the end of each board halfway over a stud to add strength and help prevent cracking along the seams. It’s also a good idea for homeowners to stagger the vertical end joints in each room of their home. This will create a stronger wall and will also be easier to hide when it comes time to hang a light fixture or other fixtures.
Whether you’re building a new home, finishing a basement, adding an extension or repairing a damaged room, installing drywall is a common DIY project. Getting the hang of this tough, sturdy wallboard can save you thousands over professional installation and make your home improvement project go much smoother. It’s important to take your time and do the job correctly, as a misaligned sheet can develop large cracks that are difficult to repair.
The drywall sheets sold in hardware stores usually measure 4 by 8 feet, and they’re cut so one long edge fits snugly against the top “plate,” or 2x4s on top of the framing components. You can also buy drywall in longer lengths and wider widths, which help you minimize the number of seams in your new room. The preferred thickness for walls and ceilings is half-inch, but professionals often use 5/8-inch drywall on rooms with tall ceilings where thinner wallboard would sag.
To start:
- Stockpile the drywall sheets on their edges in an adjacent room until you’re ready to hang them.
- Examine each panel, especially the ends, for nicks and cuts that will need to be repaired later.
- Check that electrical wires and pipes are not close to the ends of the studs, as these may need a metal shield called a nail plate to protect them from screws or nails.
- Tuck any wires behind receptacle boxes and ceiling-fixture boxes.
Hang the first drywall panel, positioning it so that one end butts against the ceiling and the other edge lines up with the top of the framing component closest to it. Screw the drywall into place by following the stud marks on the ceiling, using five evenly spaced screws per sheet.
Repeat Step 3 for all drywall panels in the room. Be sure to stagger the joints so that you’re not lining up two adjacent drywall panels with a butt joint, which will need a lot of extra sanding and patching.
When you’re ready to finish the drywall, prepare a bucket of premixed all-purpose mud that’s stirred to a smooth consistency. Fill a mud pan with enough to allow you to apply a single thick coat over each joint and corner. Unlike drywall compound, all-purpose mud does not require a high sheen; it will dry matte and provide good support for a coat of primer.